 |
| Figure 1 - Visualization of azimuth |
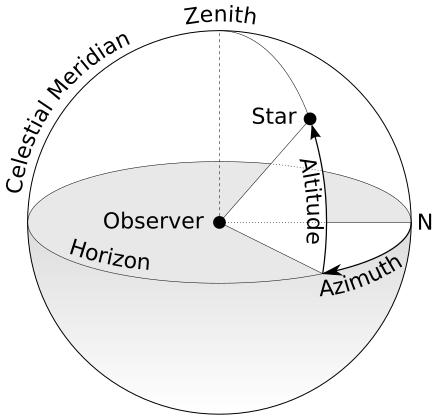
Azimuth is an angular measurement of where something is in relation to true north and the observer (Figure 1). For example, north is 0° or 360°, south is 180°, east is 90°, etc. Slope distance is the distance from one point to another along a slope. Think of it as the length of a right triangle's hypotenuse as opposed to the triangle's length (Figure 2). As long as we have accurate coordinate location for where we are standing when taking the readings, we can use slope distance and azimuth to chart anything within range.
 |
| Figure 2 - Difference between slope distance and horizontal distance |
 |
| Figure 3 - TruPulse 360 Laser Rangefinder |
Methods
Equipment: TruPulse 360 Laser Rangefinder (Figure 3)
The TruPulse rangefinder comes equipped with many functions, but we only need azimuth and slope distance. When looking through the viewfinder, there is a display along the bottom informing the surveyor what measurement is being displayed, and along the top is the actual measurement. On the left side of the device are arrow buttons used to switch modes. "SD" indicated standard distance (in meters) and "AZ" indicated azimuth. On the top of the device is a "fire" button which must be held for a few seconds to get accurate readings. Firing the laser once will collect all the data, so distance and azimuth can be recorded by only firing the laser once per object.
Magnetic Declination
One issue when finding azimuth is the magnetic declination. This refers to the angular difference between true north (geographical north) and magnetic north (compass needle north as found by using magnetic field lines). If magnetic north lies to the east of true north, it is considered positive declination. The declination is negative if to the west. Some areas can vary drastically, others very little. Before going out into the field, it is always a good idea to check magnetic declination for a study area to ensure measurements are accurate, or can be adjusted for if needed. The magnetic fields of the Earth slowly change over time, and that means magnetic declination does as well.
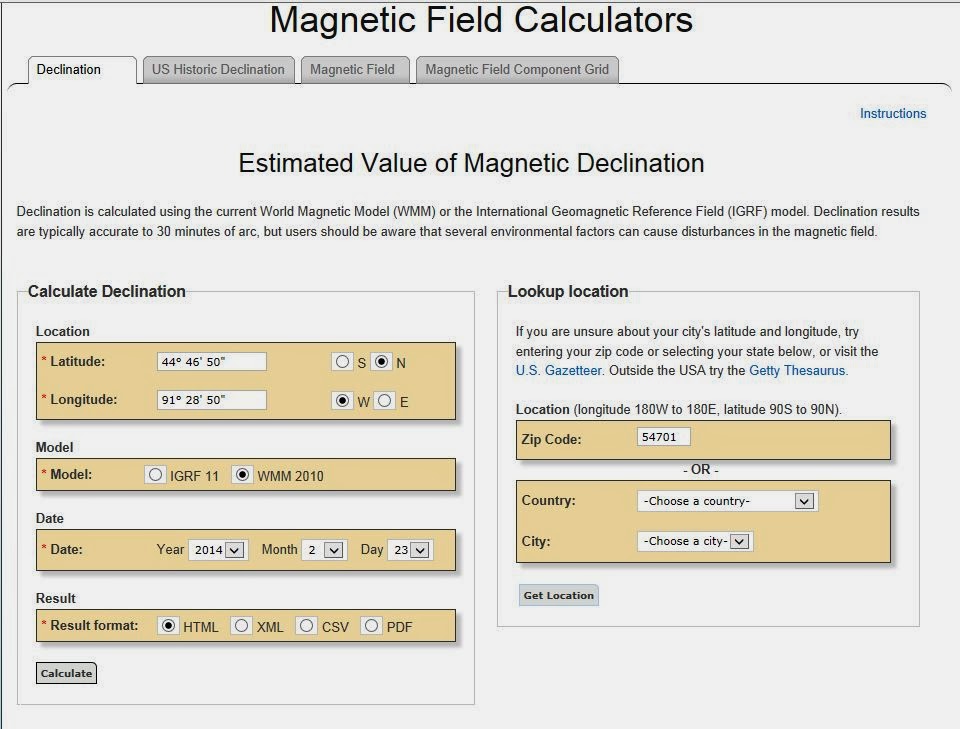 |
| Figure 4 - Enter zip code to find location, then calculate to get magnetic declination |
 |
| Figure 5 - Magnetic declination results: 1° 4' 53" W |
For Eau Claire, we have a magnetic declination of -1° 4' 53". This is a relatively small declination, so we didn't make any adjustments.
Survey Area
Our group wanted to survey an area on campus. In order for this to work, we needed to pick places to survey from that we would easily be able to find accurate coordinates for. Using a GPS device would be too inaccurate. The best thing to do would be to survey from places that would be easily spotted from satellite images (building corners, street corners, etc.), find them on a base map in ESRIs ArcMap, and get the lat/long coordinates from that.
 |
| Figure 6 - Red shows areas of campus that are out dated in this image. Area in blue is the study area we settled on since it was relatively unchanged. |
In figure 6, I have areas that have completely changed since this image was taken boxed in red. The area in blue is our study area (also in figure 7). This seemed to be a large area that was relatively unchanged that had many features that we could survey.
 |
| Figure 7a - Area on Campus to be surveyed. |
Survey |
| Figure 7b - Locations where we would survey from. |
To do the survey, we used three different locations that could be spotted in figure 7 so that we could use ArcMap to find the lat/long coordinates. For each location, we stood in one spot and gathered data from 25 different features. At each location, a different member of our group operated the device while another wrote down the readings that were called out. This way we all got experience using the TruPulse. For each feature, we documented item number, type of feature (bench, light pole, tree, etc.), slope distance, and azimuth (Figure 8).
 |
| Figure 8 - Documentation of TruPulse data |
 |
| Figure 9 - Location #1, looking northwest |
 |
| Figure 10 - Location #1, looking northeast |
 |
| Figure 11 - Location #2, looking south |
 |
| Figure 12 - Location #3, looking southeast |
 |
| Figure 13 - Zach using the TruPulse at location #2 |
 |
| Figure 14 - Excel spreadsheet with our field data ready to be imported into ArcMap |
 |
| Figure 15 - Coordinate data displayed in ArcMap showed Location #1 and Location #2 had the same decimal degree location |
 |
| Figure 16 - Google Earth displayed more precise coordinate locations, but not in decimal degrees |
 |
| Figure 17 - Website used to convert degrees/minutes/seconds measurements from Google Earth to decimal degrees |
Once the spreadsheet was completed, it was ready to be imported into ArcMap. First, though, we needed to create a geodatabase for all of our data to reside in. A geodatabase is a way to store, organize, and easily access spatial data. To create a new geodatabase, go to Catalog in ArcMap, right click on a folder, and select 'create new file geodatabase.' It was here that all of the data could be saved. To import the Excel table, I right clicked on the new geodatabase in the Catalog and selected 'import --> table (single).' Then I just had to select the sheet (not the whole workbook).
Using the table that I just imported as the input file, I ran the "Bearing Distance To Line" tool. This can be found in the ArcToolbox under 'Data Management Tools' then 'Features' (Figure 18). This tool used the starting coordinates, the azimuth, and the distance to create a new line feature class (Figure 19).
 | |||
| Figure 18 - Bearing Distance To Line tool in ArcToolbox |
 | |
| Figure 19 - Line feature class created using Bearing Distance To Line tool |
 | ||
| Figure 21 - Feature class created with Feature Vertices To Points tool, as well as the line feature class from figure 19. |
 |
| Figure 20 - Feature Vertices To Points tool |
 |
| Figure 21 - Example of using the Search tab |
Results
 |
| Figure 22 - Final results of Bearing Distance To Line tool over a satellite imagery basemap |
Our survey turned out pretty accurate. Figures 22 and 23 show the results overlaid on a satellite imagery base map, and Figure 24 shows the most notable errors circled in red. The points that we took the survey from look slightly off, meaning all the other points are just slightly off as well. There were a couple of points that were very off. One line ends in the Chippewa River, and two lines are on the library.
 |
| Figure 23 -Final results of Feature Vertices To Points tool |
 | |
| Figure 24 - Major errors in final results (circled in red). |
Discussion
Overall, I thought the survey went well. The starting points could be slightly wrong simply because the coordinates we used weren't exact. If we changed the X and Y fields, all the of the data could be improved. Also, I don't know how sensitive the TruPulse is when measuring slope distance. For example, would the reading be very different if the surveyor is pointing at the base of a tree or the middle of a tree? Perhaps it would have been more consistent if only one person used the TruPulse the whole time, as opposed to trading off?
The two points in the library that seem like errors could actually be features that are hidden by the large overhang above the main entrance (like a bench or a garbage can), and so not errors at all. Lastly, the point in the river could simply be human error. The measurement could have been said wrong, written wrong, transferred to Excel wrong, or the button wasn't held down long enough. All of these are possibilities.
On the plus side, it was a fairly nice day outside. Amiable weather makes taking accurate measurements much easier. In our first lab, I felt that our data collection might have been more accurate had it not been windy and sub-zero. Double-checking becomes less of a priority when you can't feel your fingers. For this lab, however, we could concentrate on the exercise.
Conclusion
I can see how this tool would be very useful in the field, though probably not on it's own. It is good to have as a back up, but doesn't seem as accurate as would be needed when working in the field professionally. It is always a good idea to know how to complete a task multiple different ways. When in the field, you can't always count on technology. This method is relatively low-tech and easy, so can be used anytime. Not only have I learned a new skill, but it also helped me to understand a little more about survey techniques. This method is very basic; pick a point that you can confirm is correct, then find where everything else is relative to that point. If your first point is correct, than all the other points should be correct too. Even without a laser rangefinder, this strategy could be put to use in many situations.
No comments:
Post a Comment