This week, we were back at The Priory for a navigation exercise, but with a twist. All of the course markers from the last navigation exercise were in the same locations, and this time we had to navigate to all of the points (not just one of the three courses). Instead of using our map and compass for navigation, our groups (same groups as last time) had access to a shapefile that had the location of all the points. Using a GPS unit, we were to navigate to each point (in any order we wanted) and log a point with the GPS showing we had been there. The twist to this navigation assignment was that we all had paintball guns.
Since every group had different starting locations, and could navigate to the points in any order, groups would have random encounters with other groups. It was a navigation race, and if any member of your team was shot your whole team had to stop moving for 1 minute. The idea was to use geographical combat tactics to help better understand navigation. Do you want to walk straight through that clearing towards the course marker? Or take a little extra time going around so that you aren't ambushed without cover? The point of the game was to add another layer to our thought process (and make it really fun), instead of just traipsing through the woods from point to point.
Equipment
 |
| Trimble Juno GPS using ArcPad to track our progress and points. |
 |
| Paintball guns. This Tippmann A-5 was the most common paintball gun we had access to, but there were several other random models in the bins as well. |
 |
| Safety masks. This is not the one we used in the field, but I forgot to photograph the ones we used before they were put back in storage. The one pictured is the cheapest one I found on Amazon.com, and it looks to be drastically higher in quality than what our class was actually wearing. |
On April 28, when we were supposed to do a navigation exercise at The Priory, the weather was pretty bad. Instead, that day was devoted to preparing for this last exercise on May 5th. This actually turned out to be good, as we had time to set up the GPS devices and export any layers and shapefiles we thought would help. We also planned out the path we would take once we started.
 |
| Figure 1 - Navigation map that would be used on the GPS. Contains contour lines and a DEM. The red polygons show strict no-fire zones. |
 |
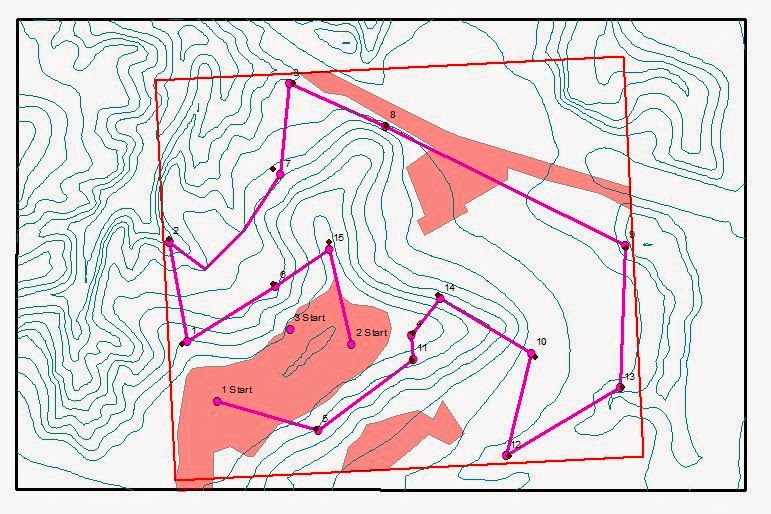
| Figure 2 - Navigation map with the planned route. |
 |
| Figure 3 - ArcPad toolbar. |
 |
| Figure 4 - Finished GPS map for use in The Priory. |
Study Area
 |
| Figure 5 - Location and extent of our study area: The Priory. |
Navigation
Before anything could be done, Professor Hupy and several students helped get all of the paintball equipment ready. Tanks of compressed gas and paintball hoppers had to be attached to all of the guns, and we tested them to make sure they all worked (Figure 6). By the time the entire class was there, the arsenal was laying on the grass near the edge of the woods (Figure 7).
 |
| Figure 6 - Professor Hupy and students assembling the guns and making sure everything works. (Good trigger discipline, Joe) |
 |
| Figure 7 - All of the working paintball guns laying in the grass, ready to go. |
 |
| Figure 8 - The black circle shows where we encountered the most resistance. Along that path we got into several firefights with several different groups. The blue line shows the detour we took around the fenced off area. |
I had the Trimble, so at each point I had to get close to the flag and collect a point. Jeremy and Zach covered me while doing this, since it took about 10 seconds to gather the point. Jeremy was the only one in our group wearing full camouflage, so during most encounters with other groups Jeremy would flank while Zach and I drew their fire.
Results
We were able to collect all the points, but we only finished 3rd. Figure 9 shows our navigation map again, but this time with all the points I collected.
 |
| Figure 9 - Completed navigation map with points we collected at each marker. |
Discussion
I was surprised that we only came in third. The first 3rd of our path included several firefights, but after that we rarely even saw another group, much less engaged them. I, for one, was getting exhausted in the heavy clothes, and I am not in as great of shape as many people in the class. The masks we had to wear was the biggest problem. My mask was constantly fogged up, so I could not see where I was walking or shooting. I had to constantly take it off and wipe the visor clean. This made me nervous, since the thought of getting shot in the face was not appealing.
For each point I collected, I put the Trimble right under the marker. As you can see in figure 9, these points are not exactly on the points in the feature class given to us. This shows that, whether it was the GPS unit I was using or the one used to mark the points, GPS devices (even expensive ones) are not 100% accurate.
We had turned on a track log on the Trimbles. This would keep track of the actual path we walked the whole time. There was no track log when I retrieved the data, however. It turned out that the menu where we selected to activate the track log was actually just to display the track log, not turn it on. That was in a different menu. As a result, no one had this data. It would have been really interesting to see the path each group took, and to see how far we deviated from our path because of obstacles or opposition.
Conclusion
Adding the paintball guns to the mix was more than just making it fun. After each firefight, we had to find out where we were and get back to our path. We had to plan the gathering of our points from a tactical perspective. One of the points (point 3) was just on the other side of a clearing. As we walked up to it, another group was approaching the same point from a different side of the clearing. Using cover fire and flanking, we had to suppress the other group long enough to gather the point and get out of there. It added another layer of problem solving to the navigation. Otherwise, we would have just walked through the clearing, taken the point, and moved on. With the threat of getting shot, we had to put the navigation part of the exercise to the back of our minds, making it second nature.
Adding the paintball guns to the mix was more than just making it fun. After each firefight, we had to find out where we were and get back to our path. We had to plan the gathering of our points from a tactical perspective. One of the points (point 3) was just on the other side of a clearing. As we walked up to it, another group was approaching the same point from a different side of the clearing. Using cover fire and flanking, we had to suppress the other group long enough to gather the point and get out of there. It added another layer of problem solving to the navigation. Otherwise, we would have just walked through the clearing, taken the point, and moved on. With the threat of getting shot, we had to put the navigation part of the exercise to the back of our minds, making it second nature.
best paintball gun 2019
ReplyDelete